ASP.NET Core SSL from Development to Production
You pretty have to use SSL these days but getting started with ASP.NET Core was a bit of a challenge for me. As usual I had to scour the net for bits of information and then cobble a solution together and this post is basically what I did to get from development to production. The code for this tutorial can be found here.
Development (macOS)
First it's nice to use SSL in development so your coding environment best simulates what you'll be doing in production. There's an excellent post here on setting up SSL locally with ASP.NET Core. It's well worth reading so I won't go into too much detail but this is basically what you need to do.
First create a certificate and key using openssl. Create a localhost.conf file for the default values like mine here and substitute password at the end for something else (if desired).
openssl req -x509 -nodes -days 365 -newkey rsa:2048 -keyout localhost.key -out localhost.crt -config localhost.conf -passin pass:password
Then create the .pfx file which will be added to your local keychain. Again this uses openssl. Enter the password used in the previous step when prompted.
openssl pkcs12 -export -out localhost.pfx -inkey localhost.key -in localhost.crt
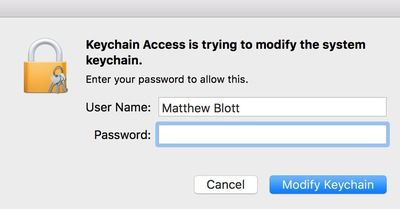
Open the macOS Keychain Access and drag the pfx file into the System section. Enter the system / admin password when prompted.

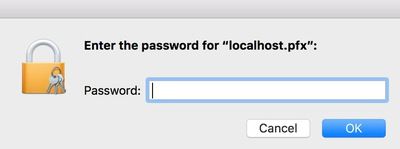
Then enter the password created with the file in the step earlier.

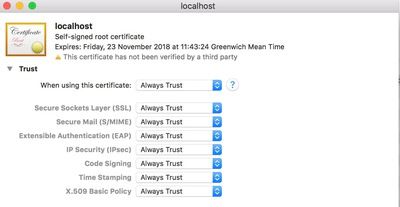
Then double-click on the Keychain Access entry and set to Always Trust so you don't continue to get a warning in the address bar when using https.

You can run the following as a check if desired.
openssl x509 -in localhost.crt -text
ASP.NET Core Code
My code for loading the certificate is pretty similar to that of the tutorial I refer to at the start. Below is the code for the Program.cs file where you'll have the Main method. One change is I've included the environment variable as I like to have a hosting.json file for each environment (I went to deploy and realised I already had a site using the default port 5000).
using System;
using System.IO;
using System.Linq;
using System.Net;
using System.Security.Cryptography.X509Certificates;
using Microsoft.AspNetCore;
using Microsoft.AspNetCore.Hosting;
using Microsoft.Extensions.Configuration;

namespace aspnetcore
{
  public class Program
  {
    public static void Main(string[] args)
    {
      BuildWebHost(args).Run();
    }

    public static IWebHost BuildWebHost(string[] args)
    {
      var environment = Environment.GetEnvironmentVariable("ASPNETCORE_ENVIRONMENT");
      var currentDir = Directory.GetCurrentDirectory();

      var config = new ConfigurationBuilder()
        .SetBasePath(Directory.GetCurrentDirectory())
        .AddJsonFile("hosting.json", optional: true)
        .AddJsonFile($"hosting.{environment}.json", optional: true)
        .AddEnvironmentVariables()
        .Build();

      var urlSettings = config.GetSection("urls");
      var urls = urlSettings.Value.Split(';');
      var url = urls.First();
      var uri = new Uri(url);
      var port = uri.Port;

      var host = WebHost.CreateDefaultBuilder(args)
        .UseConfiguration(config)
        .UseContentRoot(currentDir)
        .UseStartup<Startup>()
        .UseKestrel(options =>
        {
          options.Listen(IPAddress.Loopback, port, listenOptions =>
          {
            var certificateSettings = config.GetSection("certificateSettings");
            var certificateFileName = certificateSettings.GetValue<string>("filename");
            var certificatePassword = certificateSettings.GetValue<string>("password");
            var cert = new X509Certificate2(certificateFileName, certificatePassword);

            listenOptions.UseHttps(cert);

          });

        })
        .Build();

      return host;

    }

  }

}
Here's an example of the hosting.json file. The password will be the same as that used earlier when you created the certificate.
{
  "urls": "https://localhost:5000",
  "certificateSettings": {
    "filename": "localhost.pfx",
    "password": "password"
  }
}
And here's a bare bones example of what you need in Startup. The parts to note are the RequireHttpsAttribute method called in ConfigureServices - which basically means no part of your site will execute unless it's called via https - and the AddRedirectToHttps method called in Configure which redirects any http calls to https.
using Microsoft.AspNetCore.Builder;
using Microsoft.AspNetCore.Hosting;
using Microsoft.AspNetCore.Mvc;
using Microsoft.AspNetCore.Rewrite;
using Microsoft.Extensions.Configuration;
using Microsoft.Extensions.DependencyInjection;

namespace aspnetcore
{
  public class Startup
  {
    public IHostingEnvironment HostingEnvironment { get; }

    IConfigurationRoot Configuration;

    public Startup(IHostingEnvironment env)
    {
      HostingEnvironment = env;

      var builder = new ConfigurationBuilder()
        .SetBasePath(env.ContentRootPath)
        .AddJsonFile("appsettings.json", optional: true, reloadOnChange: true)
        .AddJsonFile($"appsettings.{env.EnvironmentName}.json", optional: true, reloadOnChange: true)
        .AddEnvironmentVariables();

      Configuration = builder.Build();

    }

    public void ConfigureServices(IServiceCollection services)
    {
      services.Configure<MvcOptions>(options => { options.Filters.Add(new RequireHttpsAttribute()); });
      services.AddMvc();
    }

    public void Configure(IApplicationBuilder app, IHostingEnvironment env)
    {
      if (env.IsDevelopment())
      {
        app.UseDeveloperExceptionPage();
      }

      app.UseRewriter(new RewriteOptions().AddRedirectToHttps());
      app.UseMvc();

    }

  }

}
If you type dotnet run from the command line you should be able to access the site at https://localhost:5000.
Production
So far this is pretty much as in the other tutorial. However when I came to deploy was when it got a bit confusing. If you check the official ASP.NET Core documents here on how to deploy to Linux it gives you a lot of detail on nginx (too much in fact, you don't need to build nginx from source on Ubuntu as it instructs) but is missing how to tie in the ASP.NET code. There's also a super easy way to install certificates and their configuration (which we'll get to).
The main thing that threw me was the nginx site configuration here.
server {
    listen 80;
    location / {
        proxy_pass http://localhost:5000;
        proxy_http_version 1.1;
        proxy_set_header Upgrade $http_upgrade;
        proxy_set_header Connection keep-alive;
        proxy_set_header Host $host;
        proxy_cache_bypass $http_upgrade;
    }
}
I've deployed a few ASP.NET Core sites and at first glance there doesn't seem anything wrong. But if we look at our hosting.json file we have the following.
  ...

  "urls": "https://localhost:5000",

  ...
That's https in the urls property. I confess it took me a while messing around before I realised this! You just need to change this to make sure it corresponds correctly with hosting.json. For the rest of the configuration we'll take the easy route ...
Install certbot
This uses the excellent (and free) Let's Encrypt Certificate Authority. Here's a good tutorial on installation but the lines you'll need to run are.
sudo add-apt-repository ppa:certbot/certbot
sudo apt-get update
sudo apt-get install python-certbot-nginx
Now to install a certificate for your site run the following (replacing domain.com with whatever your domain is).
sudo certbot --nginx -d domain.com
And ... er that's it for your server certificate! If you check your nginx file you'll see the appropriate changes have been made (domain.com in my case refers to my real world domain).
server {
        server_name domain.com;

        location / {
                proxy_pass https://localhost:5000;
                proxy_http_version 1.1;
                proxy_set_header Upgrade $http_upgrade;
                proxy_set_header Connection keep-alive;
                proxy_set_header Host $host;
                proxy_cache_bypass $http_upgrade;
        }

        listen 443 ssl; # managed by Certbot
        ssl_certificate /etc/letsencrypt/live/domain.com/fullchain.pem; # managed by Certbot
        ssl_certificate_key /etc/letsencrypt/live/domain.com/privkey.pem; # managed by Certbot
        include /etc/letsencrypt/options-ssl-nginx.conf; # managed by Certbot
        ssl_dhparam /etc/letsencrypt/ssl-dhparams.pem; # managed by Certbot

        if ($scheme != "https") {
                return 301 https://$host$request_uri;
        } # managed by Certbot

}
One point of note is these certificates need to be renewed and if you google you'll see this referred to but when you install certbot it does this for you with a package crontab (see /etc/cron.d/certbot).
But ... we still have a problem. What's the certificate that's being loaded in our ASP.NET Core code? Right. Well we could ditch this code and just use a standard ASP.NET Core site and use the nginx rules. Again, I hit a problem: I simply could not find a way to load our certbot certificate with ASP.NET Core. The certbot certificate does not use a password (a good thing, we don't want our users having to enter a password when they browse our site) but there's no way I could get the certificate to load with a blank password. So, simple. I just followed the same steps at the start with openssl and created a local certificate for the site on the production server. It's up to you if you want to use one certificate for all your sites or one per site (just change localhost to something else and reference it in /etc/hosts to 127.0.0.1). It would be better if we could get both nginx and ASP.NET Core using the same certificate but I think this is a good enough work around.
Useful links ....